

This month's Papertrey challenge is to take a project you made last year and use it for inspiration on a current project. I need to make 15 cards for a card exchange this weekend so this gives me the direction I need.

I've been meaning to do another pop-up card like the Christmas cards I did.


So I came up with a pop-up flower card.

It's pretty quick to make once you have the measurements. Start with a 4" x 11" paper for the base (double sided paper is great since you will see the inside). Score at the following increments: 1", 2 3/4", 3 3/4", 7 1/4", 8 1/4", 10".

When you fold them all in the same direction you will have a base that looks like a "B" from the side.
Unfold the paper and make another score at 5 1/2". Bear with me, there are a lot of steps here, but it is easy. Cut a 2 1/2" slit in the middle of this score line, and cut another slit super close to that one to make a slot for the clear acetate piece to pop out of the base. It should be 1/8" to 1/16" wide. You want it pretty snug to hold the acetate up.

Cut two pieces of clear acetate that are 2 1/4" wide and however tall you want. One piece should be 1" shorter. Slip the longer acetate piece through the slot, and using the Tiny Attacher or regular stapler, staple the long piece to the 1" segment at the end of the base. You can use adhesive to attach the two end pieces of the base together.

I used Papertrey's Wonderful Words die to cut the words.

Love how the long loops of the letters (like the "f") look like leaves when oriented vertically. Use a little glue to attach the word to the acetate. Place the other piece of acetate that is 1" shorter on top.

The bottom of the acetate will just be resting on top of the base. This is important because it will essentially act as a ceiling and hold the base down nice and square when the card is open.

I attached the two pieces of acetate with the Tiny Attacher at the top, so it will not show behind the flower. Next time I will attach the flower using the brad instead of the adhesive since it shows through.

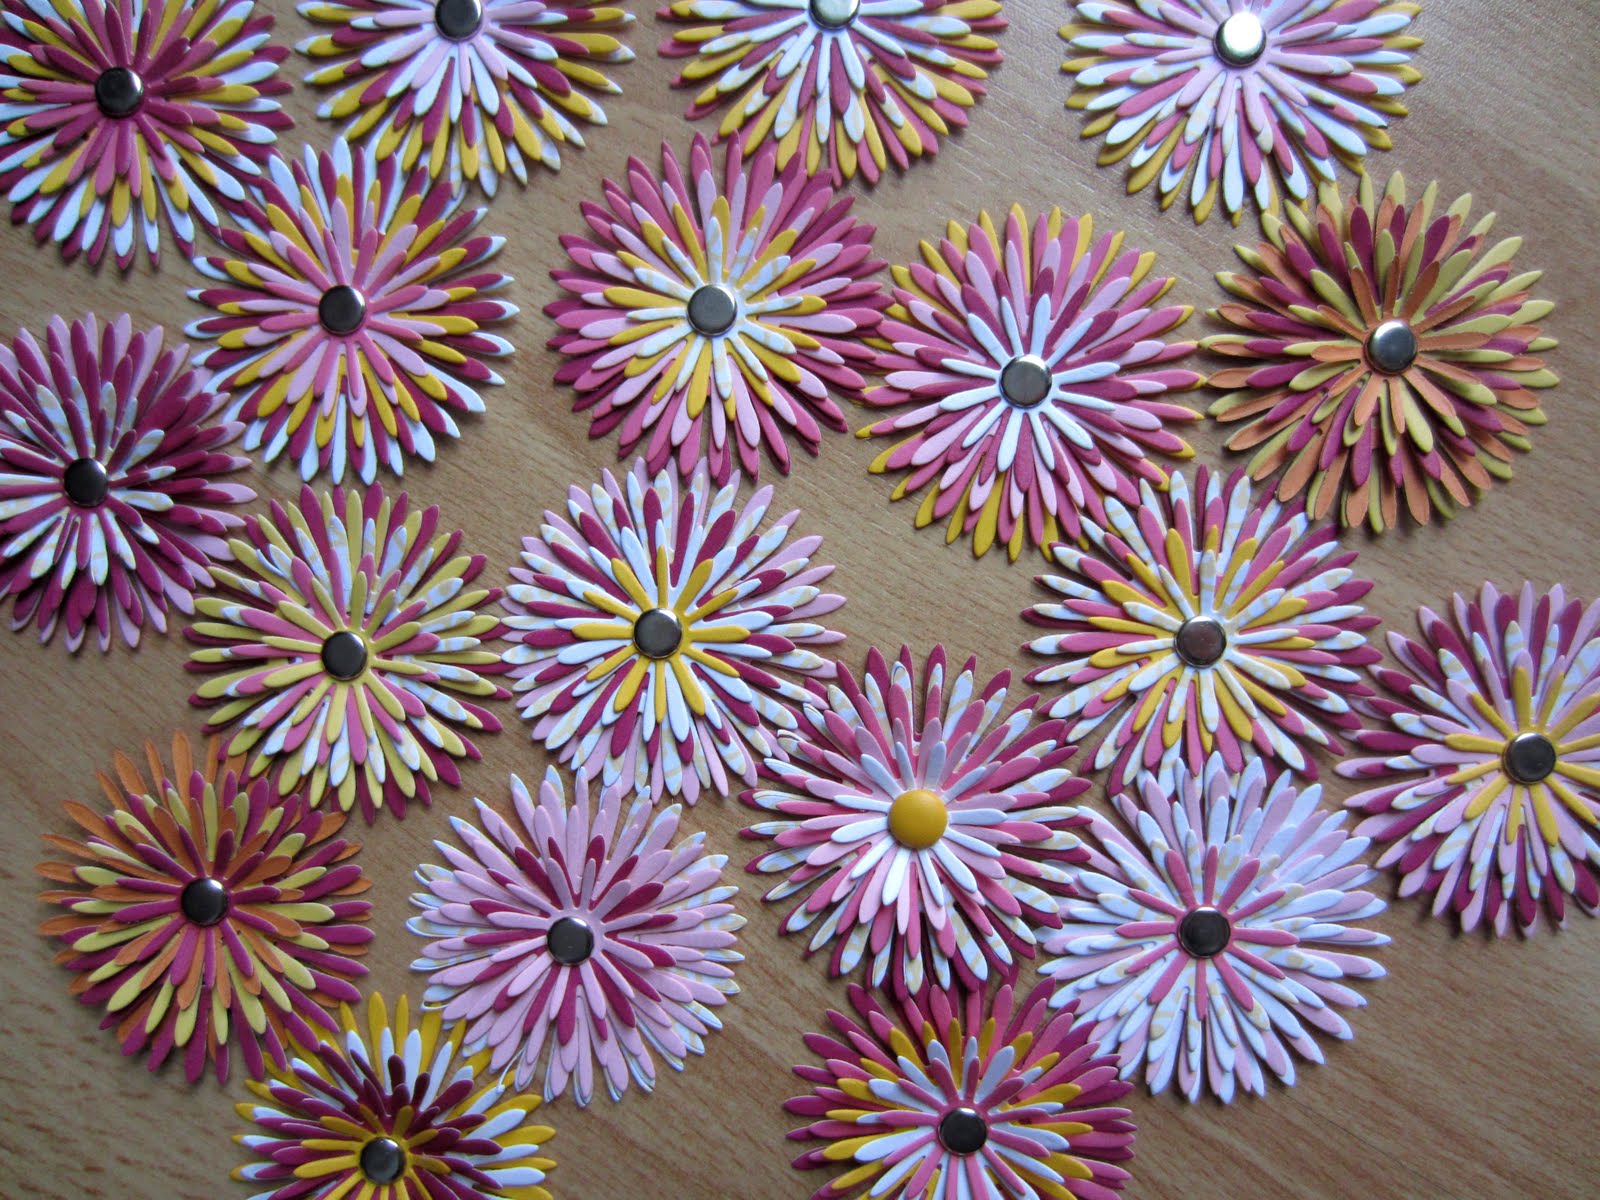
Cut flower shapes out of many colored papers. Love the Bloom Builders #3 die!

Combine the colors and just stack 'em up to get an awesome flower. So quick and simple. Use a brad to hold them all together. I bend the petals up slightly on the layers to make it more dimensional.
Attach the flower over your staples at the top of the acetate so it just overlaps the word. Cut out and attach the rest of your sentiment. Initially I used the Papertrey Double-Ended Banner die, but I needed it a little longer so I just cut a 1/2" strip of paper and notched the ends with the corner of a square punch.


My favorite part is collapsing the card after you're done. Amazingly it folds nice and flat. Perfect for fitting into an envelop. Then to re-open it you just pull the acetate. With the word being vertical I like how it is revealed as you pull it open. Then the rest of the sentiment is on the base.
OK, now I'm off to make 13 more! They do go quickly. You can get 3 bases from a 12x12 paper, so I make the score marks first, and then cut the sheet into thirds. Saves a couple steps! Oh, one other tip. I saved the clear packaging from some candles I bought at Costco. It's nice and thick. This is what I used for the card. It's large so I'll probably get 7-8 from one package. Paper is American Crafts bought in bulk from Tuesday Morning.
Please let me know if you have any questions. I'd be happy to try and help!


Wow, such fun cards, love it. I also really like how you made the each layer of the bloom a different colour.
ReplyDeleteThanks Tracey - the possibilities are endless, right? Patterned paper vs. solids in the same color is another nice look. Or newspaper print. Love that die!
DeleteI love these happy flowers! So clever to use the words in place of stems!
ReplyDeleteThat was a happy accident - the words happened to be on my desk at the time. I was going to go a completely different route, but I ended up liking this better.
DeleteWauw! Soooo super cool, these pop up flowers!! Thanks so much for the tutorial as well, looking at the photo I was wondering: how did she do that?! Love them!!! Gorgeous!!!
ReplyDeletehugs, Wendy
Thanks Wendy, hope the tutorial wasn't too long or detailed!
DeleteIncredible! I really love this~so creative! ;)
ReplyDeleteThanks Marlena :)
DeleteIncredible design! And it folds flat! Genius! I'm totally going to try this one:)
ReplyDeleteOh, I hope you try it! You'd be amazed at how easy it is, and how fun it is to pop it out. Have fun!
Deleteoh my goodnesses! I MUST try this! Thanks so much for sharing! LOVE IT!
ReplyDeleteWhat a fun card with a little surprise for the recipient!! Layering a variety of colours to create your blooms is a great idea too! Thanks for the inspiration.
ReplyDeleteThanks Karen - it was pretty fun to slide them in an out. Even the kids were getting into it!
DeleteFabulous cards, amazing design! Thanks for sharing the how-to.
ReplyDeleteThis is so fantastic!! Your projects are so unique and you have done amazing "how to" details. TFS
ReplyDeleteThanks Sadielaine! Glad you like the "how to"s. Being new to blogging I have to figure out what the right level of detail is : )
DeleteWow- an amazing,unique project. I love them.
ReplyDeleteUm...WOW!!!! What an amazing project! Thanks so much for sharing the secret behind it...and oh yeah, now I "need" to have those dies, too ;)
ReplyDeleteNo kidding, the PTI dies are to DIE for (hahaha). They are my weakness. My mother-in-law is so nice to get them for me for Christmas.
DeleteThis is so neat!
ReplyDeleteAdorable cards and using the acetate is genius! The tutorial looks easy to follow-and follow I will! Thanks for sharing!
ReplyDeleteThanks Suzanne! It felt good to use the packaging that I otherwise would have just tossed in the garbage (almost did). Sometimes being a pack-rat isn't all that bad : ) I'd love to see what you end up creating!
ReplyDeleteAbsolutely adorable! Pinned them to my 'must try' board on Pinterest.
ReplyDeleteMichael
Fantastic - I hope to see what you come up with!
DeleteThose are darling! We so appreciate you sharing them with us at Inspiration Friday last weekend and since you were the last link we will be putting this up on our facebook page! :-)
ReplyDeleteVanessa
Thanks Vanessa! Really love your blog, lots of great content there! And amazing that you had almost 500 people in your party. I haven't seen one that big.
DeleteWow, that is really cool!!!
ReplyDeleteThanks Mindy, I hope you try it!
DeleteKelly, this is SIMPLY AMAZING and very CLEVER to use your clear acetate (will definitely have to 'borrow' this!)!!!
ReplyDeleteSorry I missed this in January, but so glad you left me a comment so I could come see yours! I added a link to the first one that I found long ago, but it's from Splitcoaststampers, not SU, but who came up with it first, I have no idea?!!! Genius idea though!!!
Hi Kelly! Absolutely LOVE your clever take on this card. They look fabulous...like a pretty flower garden...all lined up! And thank you for sharing your very detailed and helpful tutorial. As you already know, you inspired me to try one too...FUN! Thank you again!
ReplyDeleteoh Awesome idea Kelly and so happy and springy!
ReplyDeleteYep, still love it, Kelly! This time? I'm giving it a go! I'll let you know if I need any hand-holding...
ReplyDelete=] Michele
These are so cute!! I've never made a pop up card but this would be so cute for my grandaughter. She is turning 13 in June. Not sure I totally understand about the acetate but I'm going to give this a try. I think she will love it. Thanks for sharing your directions!!
ReplyDeleteThese are so cute!! I've never made a pop up card but this would be so cute for my grandaughter. She is turning 13 in June. Not sure I totally understand about the acetate but I'm going to give this a try. I think she will love it. Thanks for sharing your directions!!
ReplyDeleteHi Debbie! So glad you're giving it a try, it's a fun card to make. You'll get addicted : ) Feel free to email me with any specific questions once you're making it and I'll try to help. Good luck!!
DeleteThanks for sharing. Made my twelve last night. Using them for tipping the housekeeping at our hotel. Wish I could post pic, they came out cute.
ReplyDeleteSo cute!!! Is there an equivalent acetate that you can purchase? I found some on Amazon but afraid to purchase in case they won't be stiff enough.
ReplyDeleteThat is a good question and one I'd been thinking on for awhile. I really haven't seen the thick acetate on sale anywhere, but that doesn't mean that it's not out there. The acetate that I've bought is much too thin, as you mentioned. I've just been stockpiling it for so long from random purchases that I've got a decent supply. Sorry I'm not much of a help. But maybe look for it in the packaging when you're shopping for something else. The last thing I bought with the heavy acetate packaging was a cutting board. Good luck!
DeleteVery helpful tutorial, i can do my best to make my first own.. Get the one you love. The best Pop-Up Cards i ever see.. They have verry beautiful samples. I love them.
ReplyDeleteJust found these on Pinterest - got to try it out!
ReplyDeleteI love this and I started working on one today, but I'm confused. What is the tiny slit for that you cut next to the 2 1/2" slit?
ReplyDeleteThank you for all your wonderful tutorials. This is fabulous. I wish I was talented and patient like u. You can get more patterns If you are interested in pop-up cards. View more designs from them: cherry blossom pop up card, pop-up cards
ReplyDelete